[Raspberry Pi] 라즈베리파이 library
raspberry5 pin info
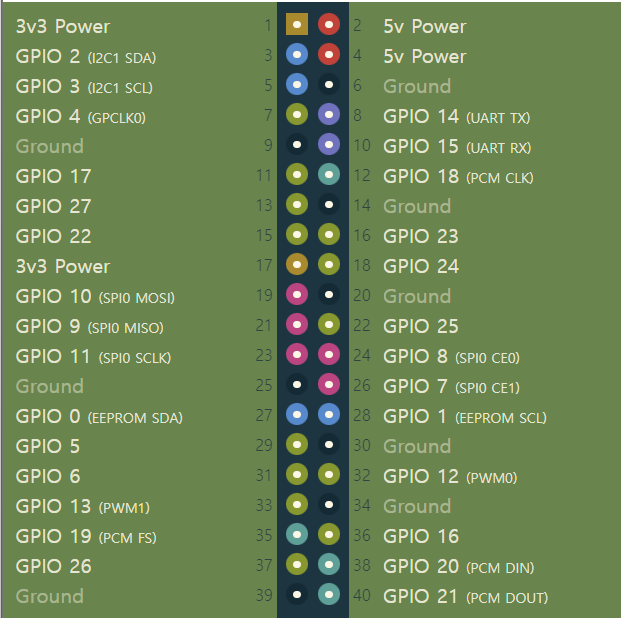
Raspberry Pi GPIO Pinout
Pinout! The Raspberry Pi GPIO pinout guide. This GPIO Pinout is an interactive reference to the Raspberry Pi GPIO pins, and a guide to the Raspberry Pi's GPIO interfaces. Pinout also includes hundreds of pinouts for Raspberry Pi add-on boards, HATs and pHA
pinout.xyz
프로그램 멈추기(sleep)
- lib : from time import sleep
- 멈추기(초단위) : sleep(second
LED (또는 lazer, FND)
- lib : from gpiozero import LED
- LED 객체 선언 : LED(핀번호)
- LED 켜기 : led객체.on()
- LED 끄기 : led객체.off()
ex)
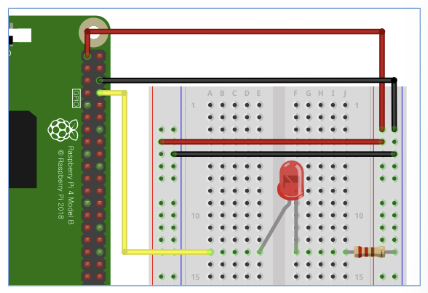
from gpiozero import LED
from time import sleep

red = LED(14) #GPIO pin number

while True:
    red.on()
    sleep(1)
    red.off()
    sleep(1)
=> 1초간견으로 LED가 꺼지고/켜지고 반복됨
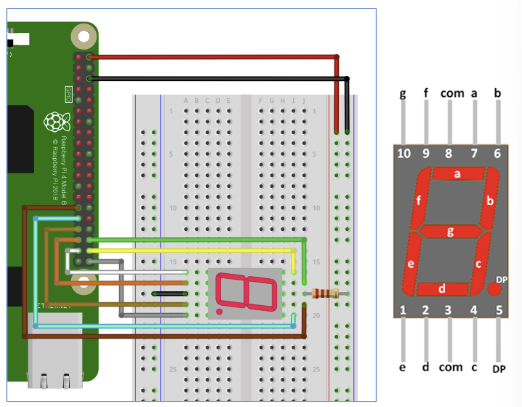
ex) Common Cathode FND

from gpiozero import LED
from time import sleep

a = LED(5)
b = LED(6)
c = LED(13)
d = LED(19)
e = LED(26)
f = LED(16)
g = LED(20)
dp = LED(21)

number_list = [ #0~9 숫자. (a <-> b 바뀜..!)
    [a, b, c, d, e, f],
    [a, c],
    [a, b, d, e, g],
    [a, b, g, c, d],
    [f, a, g, c],
    [b, f, g, c, d],
    [f, g, e, c, d],
    [f, b, a, c],
    [a, b, c, d, e, f, g],
    [a, b, c, f, g],
]

fnd = [a,b,c,d,e,f,g,dp]
for i in range(8):
    fnd[i].on()
    sleep(0.1)

while True:
    sleep(1)
=> 이를 잘 조합하여 on 시키면, 0~9숫자를 만들 수 있다!
switch
- lib : from gpiozero import Button
- Button 객체 선언 : Button(핀번호)
- Button on/off 확인 : btn객체.is_pressed
=>눌렸을때 1, 눌리지 않았을 때 0을 반환한다.
ex)

from gpiozero import Button

btn = Button(15)

while True:
    if btn.is_pressed:
        print('ON')
    else:
        print('OFF')
=> 누르고 있다면 ON, 누르고 있지 않다면 OFF가 출력된다.
=> callback 함수를 호출하는 것이 아니라, 그냥 while문에서 true, false에 따라 동작하는 것이므로 계~~~~속 출력된다.
- Button 동작 정의 : interrupt 방식(내부적으로 Threading 동작)
- lib : from signal import pause
- 눌렸을 때 동작 정의 : btn객체.when_pressed = callback함수
=> 버튼이 눌렸을때, 정의한 callback함수가 호출된다. - 눌렀다 땠을 때 동작 정의 : btn객체.when_release = callback함수
=> 버튼이 눌렀다 땠을 때, 정의한 callback함수가 호출된다.
이때, 해당 방식은 interrupt 방식이므로, 버튼에 입력 신호가 들어올 때까지 프로그램이 종료되지 않고 대기해야 한다. 따라서 코드에 맨 끝에 다음을 추가해준다.
- pause() : 프로세스 종료 or 시그널 종료 신호를 받을 때까지 대기한다.
ex)
from gpiozero import Button
from signal import pause

def press():
    print("Btn Pressed!")

def release():
    print("Btn Released!")

btn = Button(15)

btn.when_pressed = press
btn.when_released = release

pause()
=> Python Signal 라이브러리를 이용해서 인터럽트 방식으로 구현한 코드.
=> 앞선 코드와 달리, 버튼을 누른/땐 순간에만 callback 함수가 호출된다.
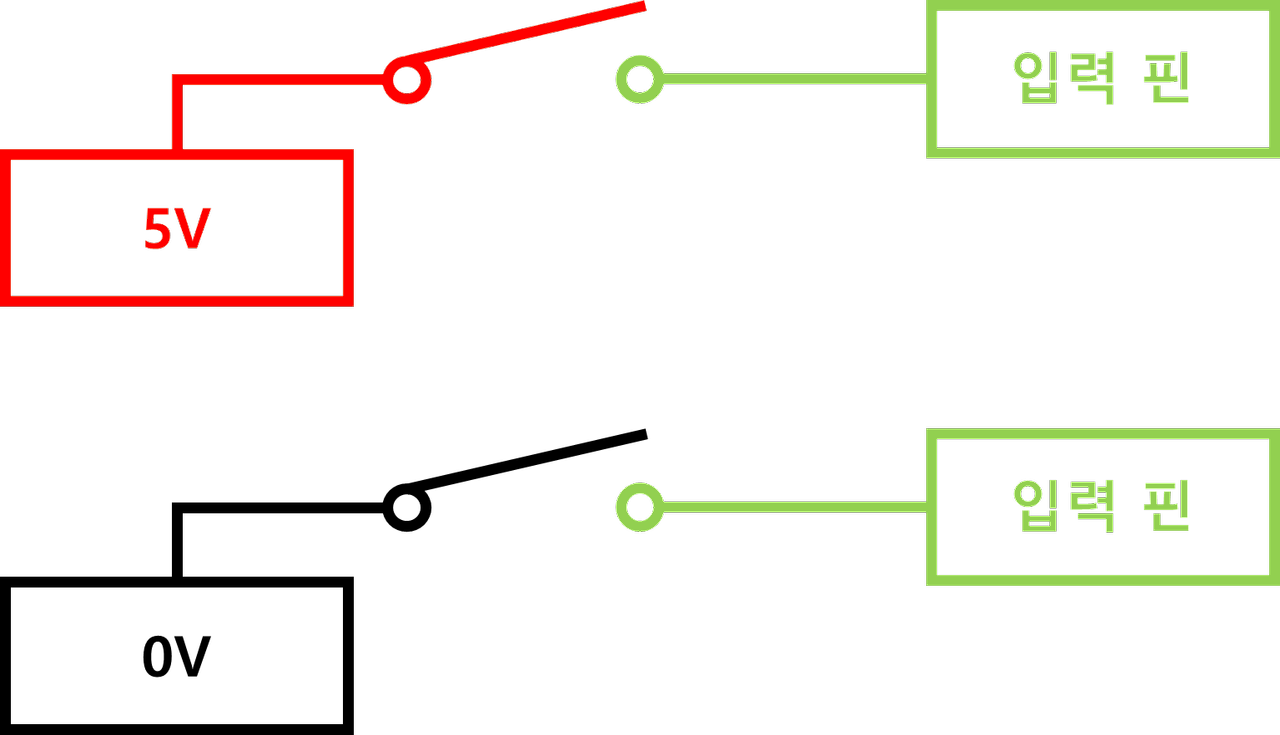
풀업 회로
- 💡floating 상태란?
- 스위치를 누르지 않으면, HIGH인지 LOW인지 알 수 없다.
- 이러한 상태를 floating 상태라고 한다.
- (라즈베리파이 뿐 아니라 모든 MCU에서 마찬가지임)
floating 상태는 S/W or H/W 적으로 해결 가능하다.
=> H/W 적으로 해결하는 것을 풀업/풀다운 회로라고 한다!
(저항을 사용해 구현)
- 풀업회로 : 스위치를 누르지 않았을 때, HIGH로 정해짐
- 풀다운회로 : 스위치를 누르지 않았을 때, LOW로 정해짐
=> 노이즈 제거, 회로 보호 등 풀업 저항의 이점이 더 많아 풀업이 주로 쓰인다.

▶ 풀업 회로
: 스위치를 누르지 않았을 때, HIGH상태이다.
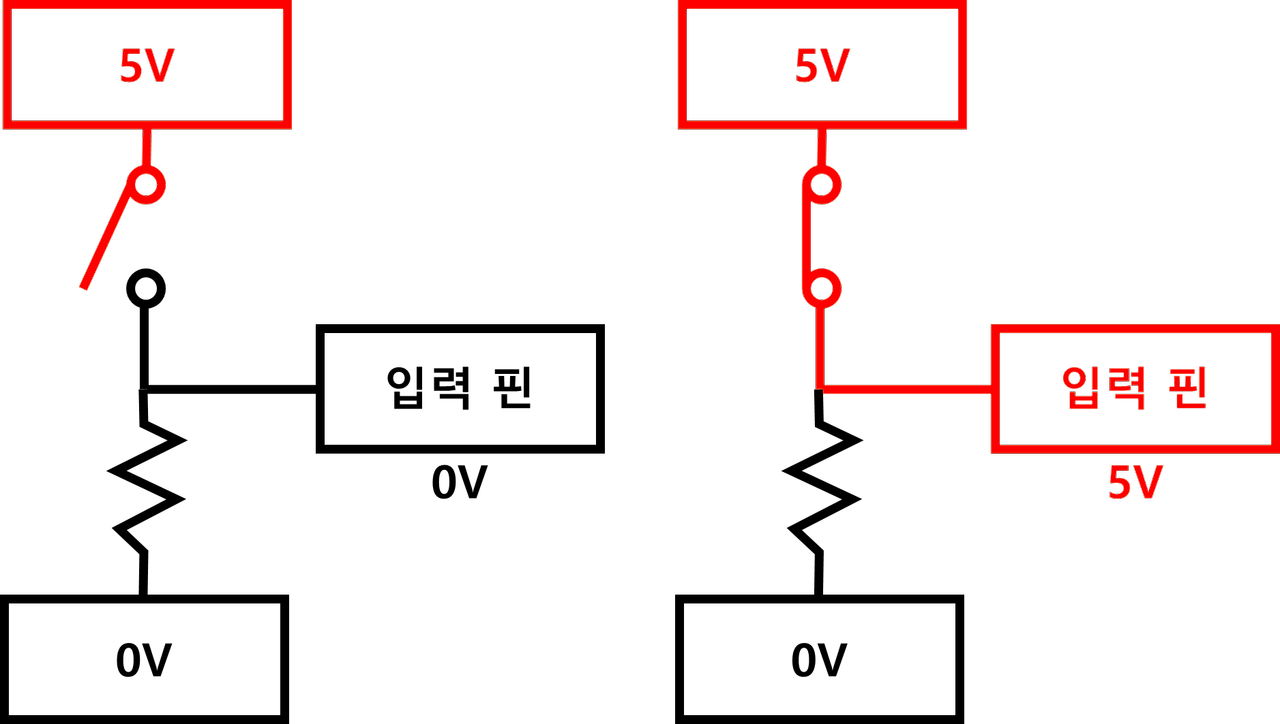
▶ 풀다운 회로
: 스위치를 누르지 않았을 때, LOW 상태이다.
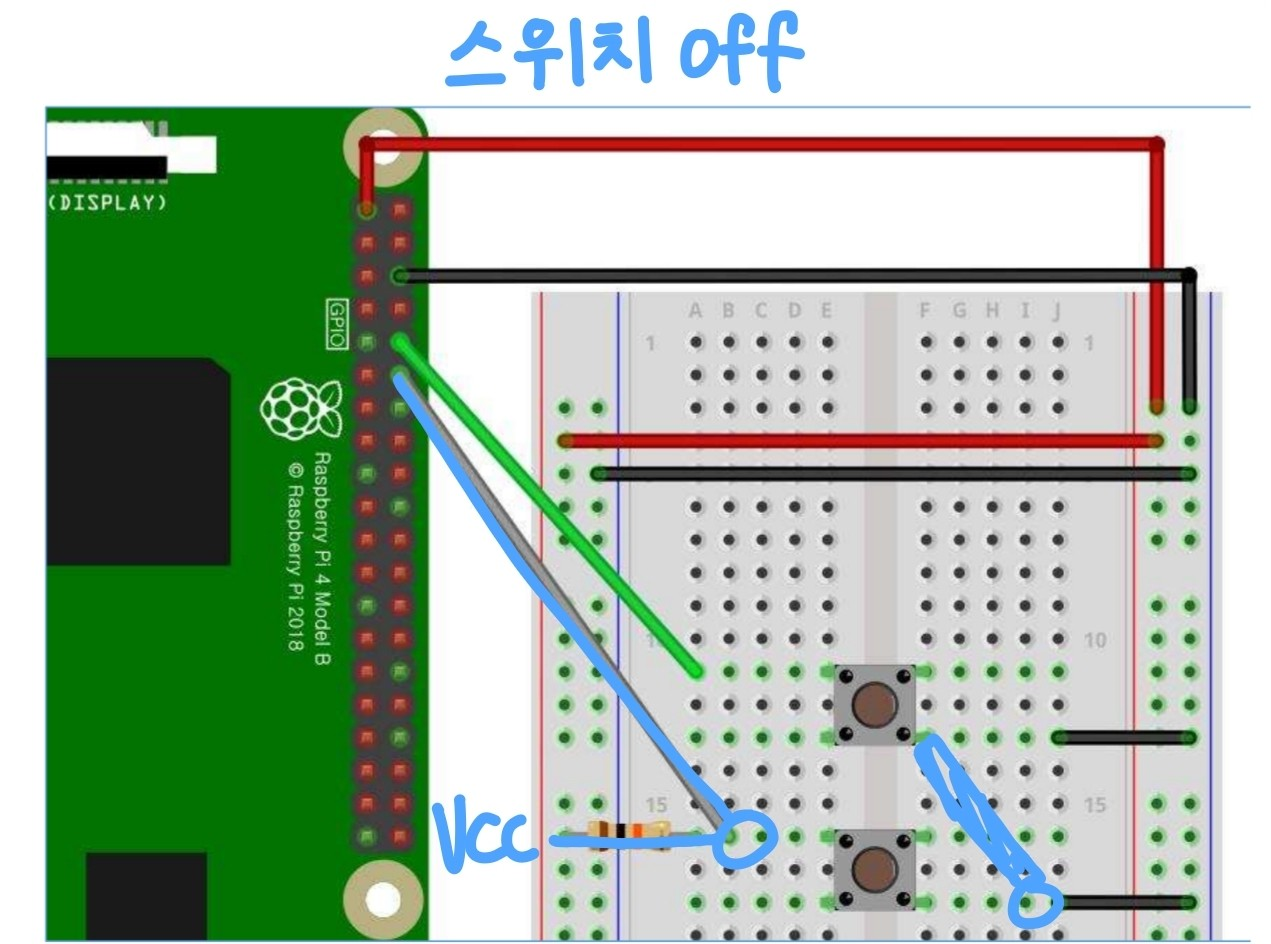
ex) 풀업회로를 사용하여도, 코드는 동일하다.
회로 구성에서, 저항을 추가해주면 된다!

from gpiozero import Button
from signal import pause

def press():
    print("Btn Pressed!")

def release():
    print("Btn Released!")

btn = Button(18)

btn.when_pressed = press
btn.when_released = release

pause()
💡그런데, 이전 예제에서는 위와 같이 풀업 회로를 구성해주지 않아도 잘 동작했다.
=> 라즈베리파이 GPIO 핀에는 내부 풀업 회로가 동작하는 핀이 있기 때문!
라즈베리 파이 통신
BMP 280 : 정밀한 대기압, 온도 센서
- lib : import smbus
- smbus 객체 생성 : smbus.SMBus(버스번호, rasp는 주로 1)
- 값 read : sm객체.read_byte_data(장치 주소, 레지스터 주소)
=> 해당 장치의 레지스터 주소로 부터 값 읽어오기
ex)
- 회로
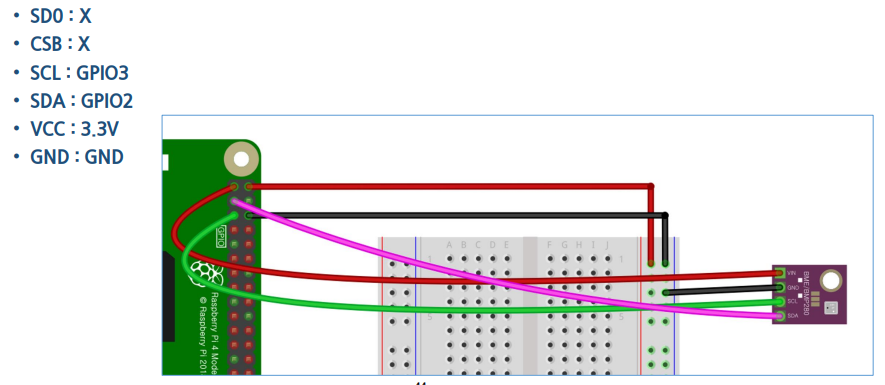
- 이때, 다음의 명령어를 통해 연결된 I2C장치의 주소를 확인한다.
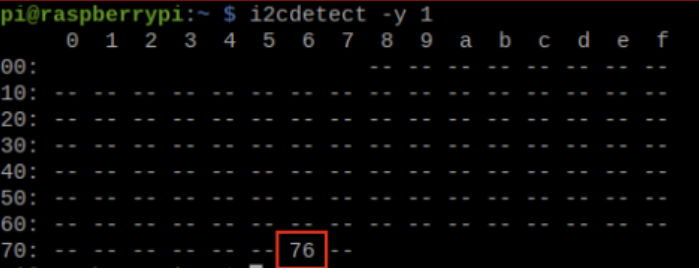
$ i2cdetect -y 1
- 코드 및 동작 : chip_id출력
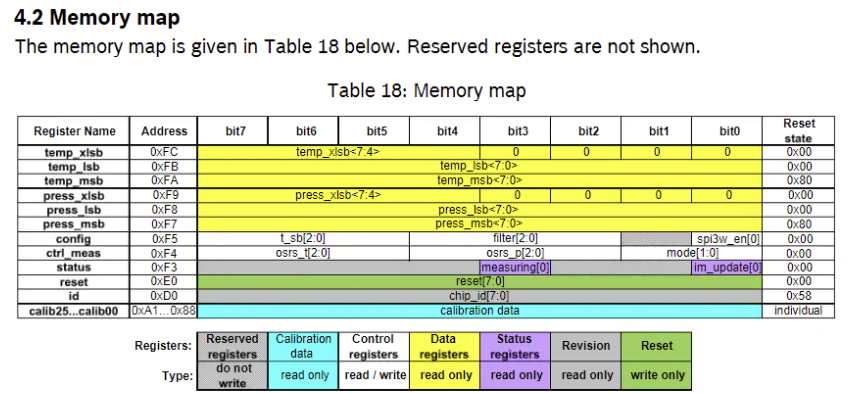
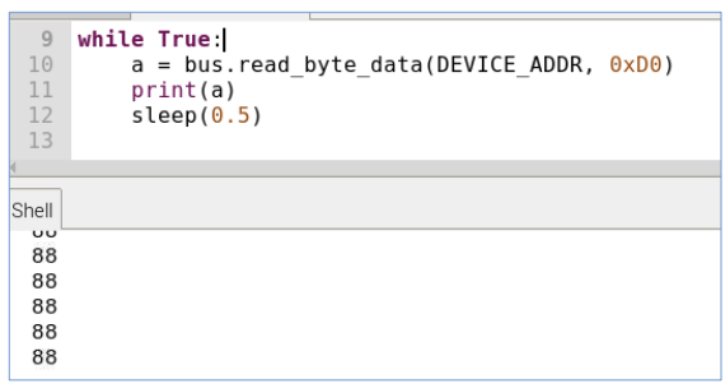
0xD0에 chip_id가 작성되어 있음 => 해당 값 출력

💡데이터 시트를 보면, id값은 0x58이라고 적혀있는데,
실제로 해당 코드 실행결과 나오는 88은 16진수로 0x58임을 알 수 있다!
import smbus
from time import sleep

DEVICE_BUS = 1 #I2C 장치에 연결된 버스 번호를 설정
			#일반적으로 Raspberry Pi에서는 1번 버스가 사용됨

DEVICE_ADDR = 0x76 #통신할  I2C 장치의 주소 (i2cdetect 명령어로 확인)

bus = smbus.SMBus(DEVICE_BUS) #smbus 모듈의 SMBus 클래스를 사용하여 I2C 버스 객체 생성

while True:

    # 0x76장치의 0xD0 register 의 값을 1byte 읽어서 출력
    a = bus.read_byte_data(DEVICE_ADDR, 0xD0)
    print(a) #=> 88
    sleep(0.5)
0xD0에 chip_id가 작성되어 있는 것을 볼 수 있다.
- 코드 및 동작 : 온도와 압력 정보 출력
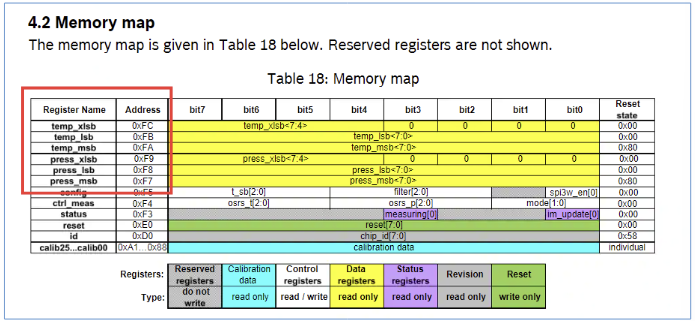
온도와 압력 정보가 각각 3개 Byte 에 나뉘어 있다.
temp : 0xFA ~ 0xFC
press : 0xF7~0xF9
- temp 정보 파싱하기
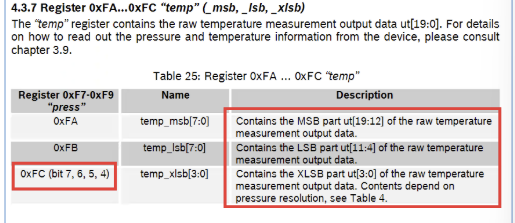

↓
해당 정보를 참고하여 temp 데이터를 알맞게 파싱하여 출력해보자!

하지만 data sheet에서 말하고 있듯, 해당 값을 그대로 출력하면 값이 잘 나오지 않는다.
=> 라이브러리를 이용해 해결할 수 있다!
import smbus
from time import sleep
DEVICE_BUS = 1
DEVICE_ADDR = 0x76
bus = smbus.SMBus(DEVICE_BUS)
while True:
a = bus.read_byte_data(DEVICE_ADDR, 0xFA)
b = bus.read_byte_data(DEVICE_ADDR, 0xFB)
c = bus.read_byte_data(DEVICE_ADDR, 0xFC)
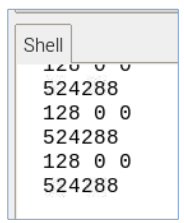
print(a,b,c)
result = (a<<12) | (b<<4) | ((c&0xF0) >> 4)
print(result)
sleep(0.5)
- 라이브러리 사용한 temp 출력
https://github.com/pimoroni/bmp280-python
GitHub - pimoroni/bmp280-python: Python library for the BMP280 temperature, pressure, and altitude sensor.
Python library for the BMP280 temperature, pressure, and altitude sensor. - pimoroni/bmp280-python
github.com
$ git clone https://github.com/pimoroni/bmp280-python
$ cd bmp280-python
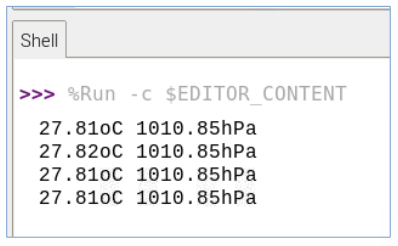
$ sudo ./install.sh=> 해당 라이브러리의 get_temperature(), get_pressure() 함수를 사용해 온도, 기압 정보를 얻을 수 있다!
from bmp280 import BMP280
from smbus import SMBus
from time import sleep

bus = SMBus(1)
bmp280 = BMP280(i2c_dev=bus)

while True:
    temp = bmp280.get_temperature()
    pres = bmp280.get_pressure()
    print('{:05.2f}oC {:05.2f}hPa'.format(temp, pres))
    sleep(1)
Sense Hat - j2 (joy stick)
- 폴링 방식
from sense_hat import SenseHat

sense = SenseHat()

while True:
    for event in sense.stick.get_events():
        print("Joystick {} {}".format(event.action, event.direction))
- 인터럽트 방식
from sense_hat import SenseHat, ACTION_PRESSED, ACTION_HELD, ACTION_RELEASED
from signal import pause

x = 3
y = 3
sense = SenseHat()

def clamp(value, min_value=0, max_value=7):
    return min(max_value, max(min_value, value))

def pushed_up(event):
    global y
    if event.action != ACTION_RELEASED:
        y = clamp(y - 1)

def pushed_down(event):
    global y
    if event.action != ACTION_RELEASED:
        y = clamp(y + 1)

def pushed_left(event):
    global x
    if event.action != ACTION_RELEASED:
        x = clamp(x - 1)

def pushed_right(event):
    global x
    if event.action != ACTION_RELEASED:
        x = clamp(x + 1)

def refresh():
    sense.clear()
    sense.set_pixel(x, y, 255, 255, 255)

sense.stick.direction_up = pushed_up
sense.stick.direction_down = pushed_down
sense.stick.direction_left = pushed_left
sense.stick.direction_right = pushed_right
sense.stick.direction_any = refresh
refresh()
pause()